The no yard needed composting solution: Vermicomposting
What is the first thing that comes to your mind when you think of composting?
Do you picture a spacious backyard with an outdoor composting bin situated far from the house? If so, I’m here to let you know that the “traditional” method of backyard composting isn’t the only way to compost!
What if someone else – or more precisely something else- could do most of the composting work for you?
Vermicomposting is a method of composting that involves worms! We know that earthworms are important components of soil health, so why not bring them indoors to work some of their magic on your food scraps? Soon enough, you’ll be left with an amazing fertilizer that can be used in your garden or on your houseplants.
Why composting matters
Before we get into the specifics on vermicomposting, here is a quick review of the benefits of composting.
Your food scraps are organic material that should readily decompose in the landfill, right? Wrong! In order for organic material to properly decompose, it needs oxygen.
However, sanitary landfills compact the waste that arrives daily, packing it under soil, and as a result, your food scraps end up being anaerobically digested which results in the production of methane.
Methane is a greenhouse gas that has a global warming potential that is 25 times higher than carbon dioxide! Composting helps to avoid the production of this harmful greenhouse gas, as well as produce useful nutrients which can be used to fertilize the land instead of chemical fertilizers.
What is vermicompost and how is it produced?
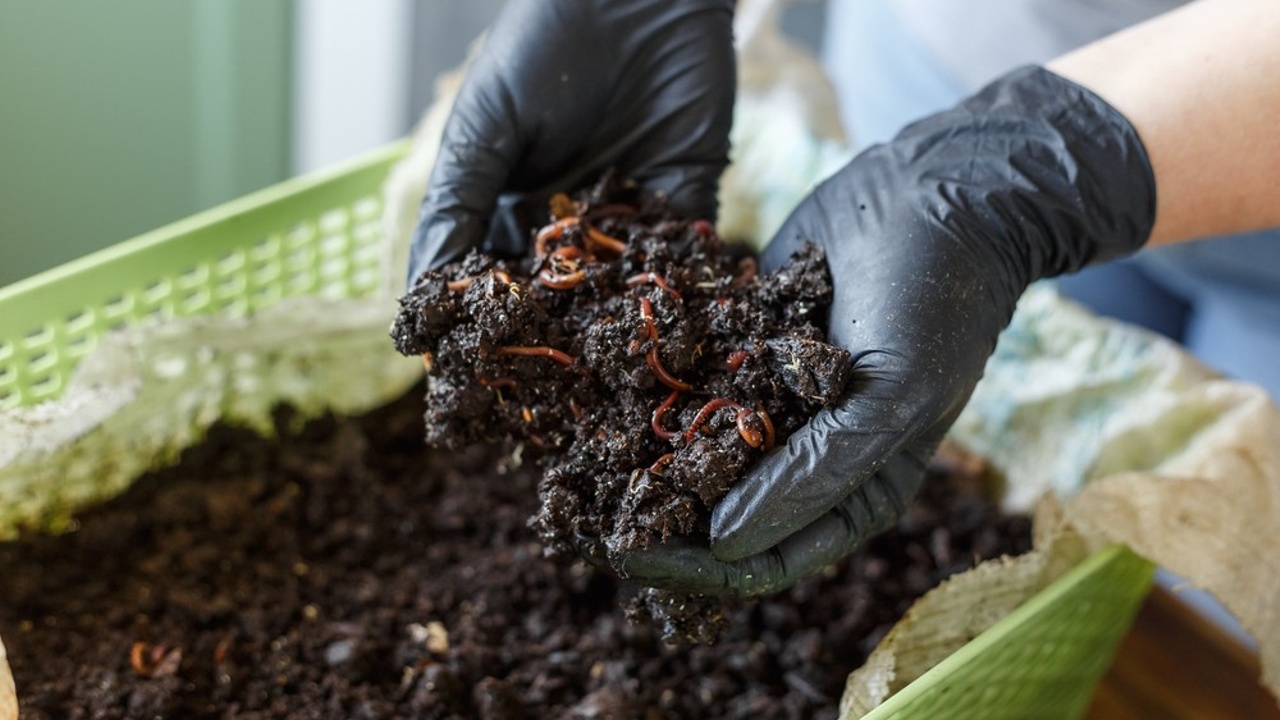
Vermicompost is made up of worm excrement (also referred to as castings) which has the ability to improve biological, chemical and physical properties of soil.

Vermicompost is produced through a two-step process. First, organic materials (such as food scraps) are digested by the worms and excreted. The worm’s digestive tracts secrete chemicals that help break down soil and organic matter, so the castings contain more nutrients that are easily accessible to plants. The second step involves microorganisms decomposing the worm excrement. The end result is a black substance that resembles regular garden soil.
Vermicompost can be produced on a small-scale using a homemade or store bought vermicomposting bin, or on a large scale in commercial facilities.
What are the benefits of vermicompost?
Vermicompost:
- Contains more macro and micronutrients than garden compost
- Is relatively low maintenance
- Enhances plant growth
- Suppresses disease in plants
- Increases soil porosity and microbial activity in soil
- Improves water retention
- Improves aeration and internal drainage
How to start your own vermicompost

There are a few things you will need to get your own vermicompost started! A container, bedding, worms, a good location, and food scraps.
1. Container
The width of your container will depend on the amount of food scraps you are planning to compost. It has been suggested that for each pound of waste, there should be one square foot of surface area. You may wish to measure the weight of your household food waste for a week in order to get a better idea of how wide your container should be. The depth of your container should be between 8 and 12 inches.
You may choose to purchase a commercial worm box or make your own. Containers can be made out of wood or plastic, although plastic is easier to clean out! One thing to keep in mind is that the material of your bin should be opaque in colour, as the worms need darkness.
Should you choose to make your own container, it is important to remember to drill 8 to 12 holes (1/4 to ½ inches) in the bottom for aeration and drainage. This means that you will need to raise the container from the ground and place a tray underneath.
If your plastic container comes with a lid, be sure that you don’t snap the lid on tightly, simply place the lid (or burlap sacking) on top of the container to provide darkness and conserve moisture
There are lots of great tutorials online that will help you build a vermicomposting bin that is perfect for your space!
2. Bedding
Bedding should take up one-third to one-half of your container and be able to retain moisture and air while providing a place for the worms to reside.
Some common sources of bedding include shredded cardboard (corrugated, not shiny!), shredded newspaper and computer paper, old leaves, shredded paper bags, or egg cartons. Any one of these sources, or a mixture, will be perfect.
Next, water is needed to moisten the bedding. Add the bedding into a large container and add water until it covers the bedding. Allow this mixture to sit for a few hours before squeezing the water out and placing it in your vermicompost bin.
3. Worms
Now comes the arguably most important ingredient for your vermicompost bin: worms!

While it may be tempting to grab some earthworms from your garden, it is important to make sure you have the right kind of worms that will thrive in your vermicomposting bin. The worms you will need to acquire are called redworms, red wigglers or red wrigglers (Eisenia fetida) and they can be bought though lawn and garden catalogs or online.
One pound of redworms will be sufficient for each half-pound of garbage.
4. Location
Vermicomposting bins do best indoors, as temperatures remain relatively stable. Outdoors it is likely to get too hot or too cold for the worms to survive.
Locations such as basements are often a good bet, as temperatures between 13°-25°C (55°-77°F) are ideal. You can test out different locations in your house while keeping these temperatures in mind.
5. Food scraps
Keep a container in your kitchen to collect your food scraps such as fruits, vegetables, coffee grounds, and crushed and dried eggshells. Avoid composting meats, dairy products, and oily foods as they may attract unwanted pests and can create unpleasant odours.

Start by adding food scraps to your bin slowly. Too much too fast can cause the organic material to rot and smell bad. Spread the scraps in a thin layer on top of the bedding. The worms will come to the surface to eat.
Vermicompost maintenance
Maintaining your vermicompost bin doesn’t take a lot of effort once you have it established. Basically, all you need to do is keep adding food until approximately two and a half months have passed.
By then there should be little of the original bedding left and you will see brown material that looks like soil. This is the finished product.
You may separate the worms from the material by moving the compost to one side of the bin and filling the other side with new bedding. Place food only on the bedding side and wait for the worms to move over to that side. Then you’ll be able to scoop the compost out and apply it wherever you see fit in your garden or houseplants!
For more guides on vermicomposting check out these articles:
Wormcomposting — City Farmer News
Vermicomposting - Composting with Worms | Nebraska Extension in Lancaster County (unl.edu)
Vermicomposting: All You Need to Know | Planet Natural
Vermicomposting: Green Action Centre
Stay connected with news and updates!
Join my mailing list to receive the latest news and updates. Your information will not be shared.